7. Customizing XFM
Note
This chapter is work in progress.
XFM can be customized by creating a custom or site-specific configuration (set
by changing the config setting in the xfm section of the xfmctl
configuration file xfm.json).
Example components that can be defined by a custom configuration are:
- Custom ingesters which perform XML schema validation of source messages.
- New message parser definitions.
- Custom RabbitMQ configuration.
- Custom loaders for specific RIM version and preprocessing.
- A custom lake with specific RIM version.
The default XFM configuration is called base and is discussed in the
chapter Messaging. When setting a configuration different from base
XFM expects a package is available on each node (either pre-installed or
through a package repository) with the same name. This package should adhere to
a predetermined structure, which will be explained below.
XFM uses Puppet to install and configure nodes. A custom configuration contains Puppet modules to define the installation steps.
Note
While Puppet modules can define complex configurations and interactions, most custom XFM configurations modules are rather small.
To demonstrate how to customize XFM, below is a walktrough of an example project.
7.1. Example project
The example project creates a custom configuration which supports custom messages based on a local RMIM, and defines a dual-head setup where data is stored in both RIM/T and RIM/J.
Note
MGRID version 3 supports both shredded (table-per-RIM-class) tables, and a new RIM blobstore (i.e. JSONB document table); both are part of the same PostgreSQL database. In the text below we use RIM/T for the table-per-RIM-class tables, and RIM/J for the JSONB document table.
The RIM version used for the source messages is:
| RIM version | 2.33R1 |
| Normative Edition | 2011 |
Note
The reason we chose RIM version 2.33R1 Normative Edition 2011 is because this is what CDA R2 is based on (which is the most common HL7v3 standard in use). By using the same RIM version data can be combined in a single RIM database.
Below is an overview picture of the targeted setup:

The ingester consumes source messages from a queue ingress-custom and
performs XML schema validation before publishing back to the message broker
(RabbitMQ).
The transformer has separate processes for outputting data in RIM/T and RIM/J format. The former is read and processed by a loader before copying to the lake, while the latter is a format that is directly copied to the lake.
The loader aggregates the RIM/T messages (in its pond) before copying to the lake.
The lake itself is a standard HDM installation.
Both the ponds and lake should have the same RIM version installed.
7.1.1. Step 1: Development environment: single node install
Starting point is a single node XFM installation, see Quickstart.
After installing the single node setup and changing to the xfmadmin user,
download the example project files:
7.1.2. Step 2: Create message parser definitions
You can find the message parser example project here.
The descriptions and parser are all generated from the model that describes the message. This model is called a RMIM and can be found in the a HL7 Normative Edition for standard models, or be specified using the HL7v3 RMIM Designer for local models. Here we use a local model.
See the MGRID Messaging SDK documentation for more details on the steps below.
First, make sure xfmadmin is the active user:
su - xfmadmin
The example RMIM design is explained in the MGRID Messaging SDK. The
output of the design process are MIF and XSD files which are used in the
example project build. In the example project these files can be found in the
models directory.
The Makefile in the example project generates the files needed for message
conversion. For a chosen RIM normative edition, it uses a RIM/T database and the
RIM infrastructue XSD file (in addition to the message MIF and XSD), see the
documentation.
In this walkthrough, the single node lake database server is used as available
from the single node install. The infrastructure XSD is taken from the
models/coreschemas directory.
To be able to access the RIM database during the build, add xfmadmin as a
database superuser:
sudo -u postgres /usr/pgsql-9.4/bin/createuser -s xfmadmin
XFM transformers use Setuptools plugins
to discover installed message converters. The entry point is called
mgridmsg.conversion and is defined in setup.py. This points to the
conversion dictionary in config.py:
conversion = {
    'rim': 'custom.generated.rim.rim233R1',
    'interactions': {
        'TZDU_IN000003UV' : {
            'parser' : 'custom.generated.parser.TZDU_IN000003UV_parser',
            'mt' : [ 'custom.generated.mif.TZDU_MT000003UV' ],
            'fixmt':[],
            'in' : []}
        }
}
Note
In config.py the keys used under interactions are used by the XFM
transformer to set the conversion parameters, and should match the
content-type header added by the XFM custom ingester (TZDU_IN000003UV
in this example).
Before generating the message conversion files, install the dependencies (in the Python environment of the xfmadmin user):
pip install lxml
and start the generation process:
make all
The resulting installation archive can be found in the dist directory. This
file will be used in the XFM configuration package in the next step.
7.1.3. Step 2: Create XFM configuration
Now the message conversion archive is ready, we can create a site-specific XFM configuration, which consists of a custom ingester, and Puppet module.
You can find the XFM configuration example project here.
7.1.3.1. Custom ingester
The custom ingester is based on Spring Integration, which allows
reuse of the default XFM ingester definitions. These definitions are imported
in the main XML configuration src/main/resources/META-INF/ingester.xml:
<import resource="config.xml"/>
<import resource="executors.xml"/>
<import resource="errorhandling.xml"/>
<import resource="metrics.xml"/>
<import resource="rabbitmq.xml"/>
<import resource="messaging.xml"/>
<import resource="custom-rabbitmq.xml"/>
<import resource="custom-messaging.xml"/>
The last two imports are specific to our custom ingester, the others are defined in the default XFM ingester JAR, which includes components for XFM configuration access, RabbitMQ connection management, error handling, flow control, and metrics collection.
The XML configuration is kickstarted from
src/main/scala/IngesterApplication.scala, which is the entry point of the
custom ingester:
object IngesterApplication extends App {
  val ac = new ClassPathXmlApplicationContext(Array("/META-INF/ingester.xml"), IngesterApplication.getClass)
}
For our custom ingester we need to know which queue to consume from, validate messages, and setting a content-type header (used by the transformer).
custom-rabbitmq.xml (in src/main/resources/META-INF) defines an
inbound channel adapter
which uses the customInboundListenerContainer bean to connect to RabbitMQ (the
listener container is defined in the same file). The p:queueNames parameter
of the listener container defines the queue names it consumes messages from
(ingress-custom). When receiving a message from the queue,
the inbound channel adapter forwards it to the customValidateSchemaChannel.
<int-amqp:inbound-channel-adapter id="customInboundAdapter"
  channel="customValidateSchemaChannel"
  error-channel="errorChannel"
  message-converter="ingressMessageConverter"
  mapped-request-headers="xfm-message-id"
  listener-container="customInboundListenerContainer"
  />

<bean id="customInboundListenerContainer"
  class="org.springframework.amqp.rabbit.listener.SimpleMessageListenerContainer"
  p:connectionFactory-ref="gatewayConnectionFactory"
  p:channelTransacted="true"
  p:adviceChain="#{new org.aopalliance.aop.Advice[]{@synchronizationActivatingInterceptor}}"
  p:acknowledgeMode="AUTO"
  p:errorHandler-ref="errorHandler"
  p:exposeListenerChannel="true"
  p:queueNames="ingress-custom"
  p:concurrentConsumers="1"
  p:defaultRequeueRejected="false"
  p:prefetchCount="${ingester.prefetch}"
  p:receiveTimeout="1000"
  p:recoveryInterval="5000"
  p:shutdownTimeout="5000"
  p:taskExecutor-ref="taskExecutor"
  p:transactionAttribute-ref="rabbitTxAttribute"
  p:transactionManager-ref="rabbitTxManager"
  p:txSize="${ingester.prefetch}"
  />
Note
The listener container also defines settings which are important to properly hook into error handling and flow control components. An example is the transaction manager and acknowledge mode, which are used to reject messages when an unexpected exception occurs. These components are defined in the XML files from the default XFM ingester JAR.
custom-messaging.xml (in src/main/resources/META-INF) defines the XML
validation and content-type header settings. The customSchemaValidator
picks up the messages from the customValidateSchemaChannel and executes the
XML validator (the validator reads the schema files from the location set by
the c:schema parameter, relative to src/main/resources):
<int:service-activator id="customSchemaValidator"
  input-channel="customValidateSchemaChannel"
  output-channel="customRoutingChannel">

  <bean class="net.mgrid.xfm.ingester.xml.XmlValidator">
    <property name="selector">
      <bean class="org.springframework.integration.xml.selector.XmlValidatingMessageSelector"
        c:schema="custom/TZDU_IN000003UV.xsd"
        c:schemaType="http://www.w3.org/2001/XMLSchema"
        p:throwExceptionOnRejection="true"
        />
    </property>
  </bean>
</int:service-activator>
If the validation fails the XML validator
(net.mgrid.xfm.ingester.xml.XmlValidator) sends the message to the error
handler, otherwise it is forwarded to the customRouter which adds a
xfm-content-type header to the message (with value TZDU_IN000003UV).
This header is used by the transformer to set message conversion parameters,
see Step 2: Create message parser definitions:
<int:header-enricher id="customRouter"
    input-channel="customRoutingChannel"
    output-channel="outboundChannel"
    default-overwrite="true">

    <int:header name="xfm-content-type" value="TZDU_IN000003UV"/>
</int:header-enricher>
After adding the header, the message is forwarded to the outboundChannel
where the XFM ingester components take care of publishing the message to the
RabbitMQ message broker.
7.1.3.2. RabbitMQ definitions
You can create a custom RabbitMQ configuration to define how messages flow
through the system. RabbitMQ defines these settings in a JSON file. The XFM
base RabbitMQ configuration can be found in the mgridxfm3-bootstrap
package, which installs it in
/opt/mgrid/xfm3-bootstrap/puppet/modules/xfm_broker/files/rabbitmq_defs.json.
While you can edit the definitions directly, a easier way is to use the RabbitMQ web console.
On the single node install you can browse to port 15672 to access the
RabbitMQ web console.
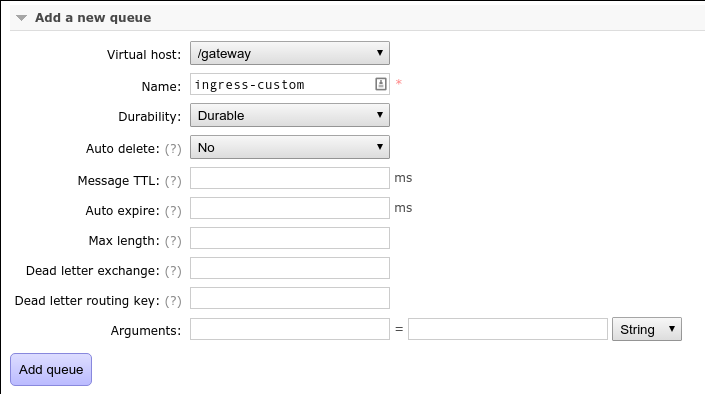
First, add a ingress queue ingress-custom on the /gateway virtual host:
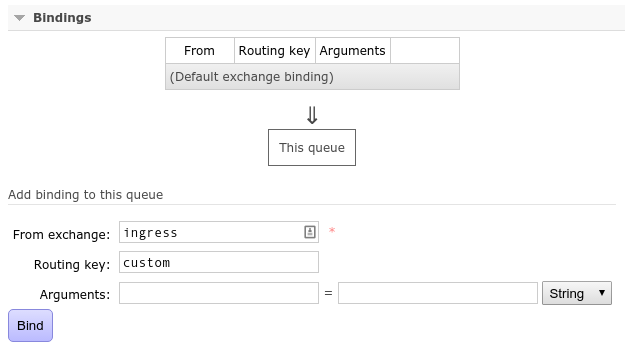
And bind that queue to the ingress exchange with routing key custom:
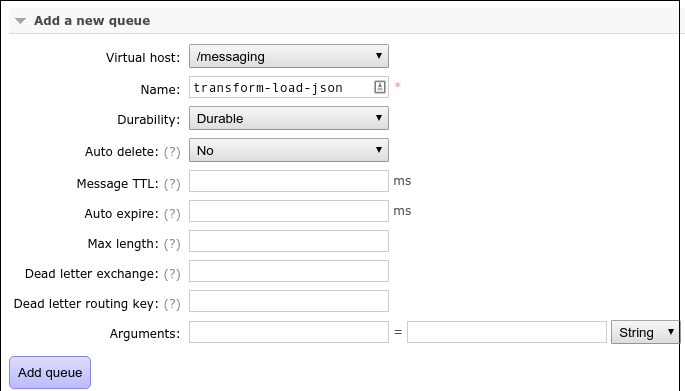
On the /messaging virtual host, add a queue transform-load-json:
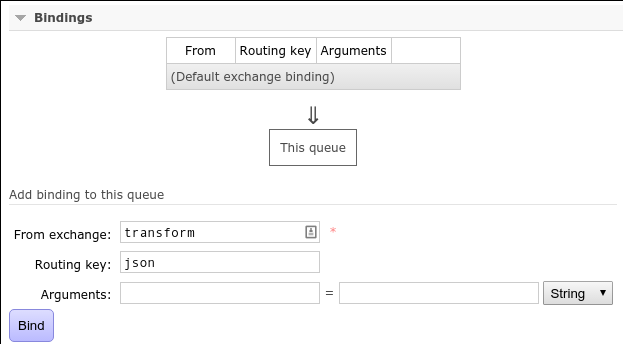
And bind that queue to the transform exchange (no routing key needed
because it is a fan-out exchange):
Optionally, the default ingress queues ingress-cdar2 and ingress-fhir
can be removed.
If ready, download the RabbitMQ definitions from the web console (on the Overview page):
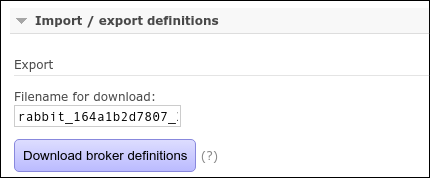
And store in src/universal/rabbitmq_defs.json of the example project.
7.1.3.3. Pond scripts
Loaders have a small database called a pond where data preprocessing takes place before it is uploaded to the lake. For our custom configuration the pond should match the RIM version, so we need a custom script for creating the ponds.
The script in the example project is in src/universal/bin/create_ponds.sh and is called with the following parameters (in order):
| Parameter | Description |
|---|---|
PONDHOST |
PostgreSQL host parameter. |
PONDPORT |
PostgreSQL port parameter. |
PONDUSER |
PostgreSQL user parameter. |
PONDCOUNT |
Number of ponds to create. |
Usage example:
create_ponds.sh /tmp 5433 xfmuser 1
If the script exists with a zero exit code, it is expected the ponds are created and ready for use by the loader.
The number of ponds is equal to the number of loader processes on a node, so the script creates a template database before creating each pond.
Not only does the script create the necessary extensions for the RIM database, it also creates the database functions used by the loader, for example to manage the pond sequences.
7.1.3.4. Pond upload
Uploading the pond takes place in micro-batches and is
orchestrated by a script in src/universal/pond_upload.sh.
7.1.3.5. Lake script
To create the lake the script is similar to the one used for the ponds;
extensions are loaded to create a RIM database with the required version. The
script can be found in src/universal/bin/create_lake.sh.
7.1.3.6. Puppet module
A Puppet module is used to bring the different parts together and describe how the site-specific configuration is installed and configured.
Note
For each node xfmctl selects the Puppet module(s) to apply based on the
node’s role (defined in xfm.json). XFM has a set of predefined roles
(see the hosts setting in the XFM configuration).
This can be overridden by the xfmctl setup command. For example, to
explicitly set the main Puppet module for a single node to xfm_custom, do:
xfmctl --roles=singlenode setup:xfm_custom
Now, when the xfmctl update command runs it will apply the xfm_custom
Puppet module, while the node’s role is singlenode. The name is set in
the Puppet configuration on the node, so you only have to run the setup
command once.
The Puppet modules for the example project are part of the custom XFM
configuration project (created in Step 2: Create XFM configuration), in directory
src/universal/puppet.
In this example the module xfm_custom creates a single node install (see
src/universal/puppet/modules/xfm_custom/manifests/init.pp):
class xfm_custom {
  require xfm_common
  include xfm_common::config

  include xfm_custom::ingester
  include xfm_custom::transformer
  include xfm_loader
  include xfm_gateway
  include xfm_broker
  include xfm_lake

  package { 'xfm-custom':
    ensure => latest,
  }
}
It references existing XFM components (xfm_common, xfm_loader,
xfm_gateway, xfm_broker, and xfm_lake). It adds two custom
components: xfm_custom::ingester, and xfm_custom::transformer, which
are defined in ingester.pp and transformer.pp (both in
src/universal/puppet/modules/xfm_custom/manifests).
ingester.pp is defined as:
class xfm_custom::ingester {
  require xfm_common
  include xfm_common::config

  $config = hiera('ingester')

  xfm_common::run_config { 'custom-ingester':
    subscribe => Package['xfm-custom'],
    command   => "/opt/mgrid/xfm-custom/bin/ingester -Dingester.hostname=${::hostname}",
    numprocs  => $config['procspernode'],
    user      => $xfm_common::xfm_user,
  }
}
It reads the XFM config, and adds a run configuration to the XFM supervisor. Possible parameters are (this is a subset of the parameters of supervisord):
commandThe command to runuserThe user to run the command asdirectoryThe directory to change to before running thecommandautostartWhether to automatically start by the command (instead of manually)numprocsNumber of processes to start (the number can be used in thecommandas%(process_num)d)environmentEnvironment variables
In transformer.pp there are two steps involved; first copying the message
conversion archive to /var/lib/xfm, and second install it so the XFM
transformer can add the definitions:
class xfm_custom::transformer {
  require xfm_common
  include xfm_common::config

  $custom_pkg = '/opt/mgrid/xfm-custom/msg-custom.tar.gz'

  class { 'xfm_transformer':
    subscribe => Xfm_common::Pyenv_pip[$custom_pkg],
  }

  xfm_common::pyenv_pip { $custom_pkg:
  }
}
For this to work the message conversion archive created in Step 2: Create message parser definitions
should be copied to src/universal/ (this is already done in the example
project).
7.1.4. Step 3: Building & Packaging
XFM expects the custom configuration location in /opt/mgrid/<PACKAGE_NAME>,
and <PACKAGE_NAME> should be used as the config settings in
xfm.json. In our custom configuration the package name is
xfm-custom.
So, for XFM to load the custom configuration, the directory structure below
/opt/mgrid/xfm-custom is as follows:
| File or Directory | Description |
|---|---|
msg-custom.tar.gz |
Message conversion definitions |
bin/ingester |
Custom ingester run script |
lib/ |
Java/Scala dependencies for custom ingester |
puppet/modules/xfm_axle/ |
Puppet module |
rabbitmq_defs.json |
RabbitMQ definitions |
Note
xfmctl expects that the configuration package is either already
installed on a node or available through a package repository.
And the source project structure:
| File or Directory | Description |
|---|---|
build.sbt, project/ |
Build definition files. |
src/main/scala |
Worker code (custom ingester). |
src/main/resources/META-INF |
Worker XML configuration (Spring Framework). |
src/universal/rabbitmq_defs.json |
RabbitMQ definitions. |
src/universal/puppet |
Puppet modules. |
To create the package, make sure SBT and RPM tooling are installed:
curl https://bintray.com/sbt/rpm/rpm > bintray-sbt-rpm.repo
sudo mv bintray-sbt-rpm.repo /etc/yum.repos.d/
sudo yum install sbt rpm rpm-build
And build the package (run from the project root directory):
sbt rpm:packageBin
Which creates the package in target/rpm/RPMS/noarch/.
7.2. Installation
When installing a custom configuration on an existing XFM installation, some
cleanup is needed which is performed through the xfmctl reset command.
Note
The reset command deletes any messages/sequences that are queued or
stored in the pond or lake databases. If no data should be lost, please
consult the backup procedures in the XFM and HDM documentation before
proceeding.
To reset an exising XFM configuration, or change to another configuration (e.g., a custom configuration), execute:
xfmctl --roles=singlenode reset
This will reset existing components and afterwards execute the setup,
update_config and update commands. As with setup, the reset
command optionally takes a custom module as parameter. For example, to reset to
the xfm_custom module, execute:
xfmctl --roles=singlenode reset:xfm_custom
Note
If the module name comes from a custom configuration, don’t forget to
change the config setting in xfm.json so the files and dependencies
are available for installation.
The last command has the same effect as executing the following on a clean system:
xfmctl --roles=singlenode setup:xfm_custom update_config update